


Table of contents
API stands for application programming Interface and it provides an interface to connect the client to the server. REST or RESTful APIs is nothing but an architectural style that uses a combination of HTTP methods and URLs where HTTP methods or verbs are standard HTTP methods like GET, POST, PUT, and DELETE to define the operations that can be performed on resources and URL is used to identify and locate resources on the server.
Let's first talk about why do we need API in the first place.
Why REST API?
When we create an application, let’s say you are building a website where users can register themselves and add the details of the books that they are currently reading, like the author’s name and book details. So there are three parts to your application: one is the frontend (which includes elements that users can see and interact with, such as the registration page, login, book list, book details, and so on), one is the backend (which communicates with the database and responds to client requests), and another is a database where your book details and user data will be stored. So you’d want the user to sign up, login, add books (create), view books (read), update books (update), delete books (delete), and so on. These operations are called CRUD operations and are performed on your database. So how do you think this is done? Whenever you click on the create book, view book, delete book, or anything else, you are basically making a request to the server, stating that you want to perform a certain action. Now, the server receives your request and performs the task on your behalf by executing these operations on the database. You then see different results based on whether your request was successful or whether it failed.
So where do APIs come into play? APIs act as an intermediate layer between the client and server, allowing users to interact with the server via certain endpoints. Endpoints are the URLs used to make a request. For example:
GET /api/users
// Here, /api/users represents the endpoint specifying the targeted resource.
// GET is the HTTP method used.
Now, you might ask, why do I need to talk to the server? Why can’t I just talk to the database? Direct connections between the frontend (client-side) and the database should be avoided because the client-side is more exposed and accessible than server-side code. Hence, it can expose sensitive information like database credentials to malicious users who could access and manipulate the data for the wrong purposes.
So, having a server-side allows you to have more control over who can perform what actions on the data, reducing the risk of client-side manipulation. Now that we understand what a REST API is, let’s start building one and understand it better.
Prerequisites
Make sure you have NodeJS and VS Code installed in your computer.
Setting up the Project
Creating a server
Open VS code
Create a folder for your project and name it Books-Api or anything else that you want
Navigate to the folder through this command
cd Books-Api command.Initialize your project with
npm init -ythis will create a package.json file in your project folder.
{
  "name": "books-api",
  "version": "1.0.0",
  "description": "",
  "main": "index.js",
  "scripts": {
    "test": "echo \\"Error: no test specified\\" && exit 1"
  },
  "author": "",
  "license": "MIT"
}
now install dependencies for your project like express, mongoose and nodemon, and dotenv.
You'll see these dependencies in your package.json now.
"dependencies": {
    "dotenv": "^16.3.1",
    "express": "^4.18.2",
    "mongoose": "^8.0.3",
    "nodemon": "^3.0.2"
  }
}
add a .gitignore file and mention node_modules over there to avoid pushing it to the github.
Create a file
Server.jsthat will be the entry point for your project.Paste the following in your server.js file.
require("dotenv").config();
const express = require("express");

const app = express();

const PORT = process.env.PORT || 5000;

app.get("/", (req, res) => {
  res.send("Hello, This is a Books API");
});

try {
  app.listen(PORT, () => {
    console.log(`${PORT} Conneted`);
  });
} catch (error) {
  console.log(error);
}
- Add a start script and the dev script in the package.json. nodemon app.js, it will be the dev script and node app.js will be the start script because while deploying the server which we will do on render, they ask for start script and nodemon they do not recognise (explain about the importance of this )
"scripts": {
    "start": "node app.js",
    "dev": "nodemon app.js",
}
Final package.json file looks like this
{
  "name": "book-api",
  "version": "1.0.0",
  "description": "A simple API for managing books",
  "main": "index.js",
  "scripts": {
    "start": "node index.js",
    "dev": "nodemon index.js",
    "test": "echo \\"Error: no test specified\\" && exit 1"
  },
  "keywords": ["book", "api", "express", "mongoose"],
  "author": "Your Name",
  "license": "MIT",
  "dependencies": {
    "dotenv": "^16.3.1",
    "express": "^4.18.2",
    "mongoose": "^8.0.3",
    "nodemon": "^3.0.2"
  }
}
Then run this command npm run dev or nodemon index.js so that you do not have to start the server again and again.

Connect to the MongoDB atlas database
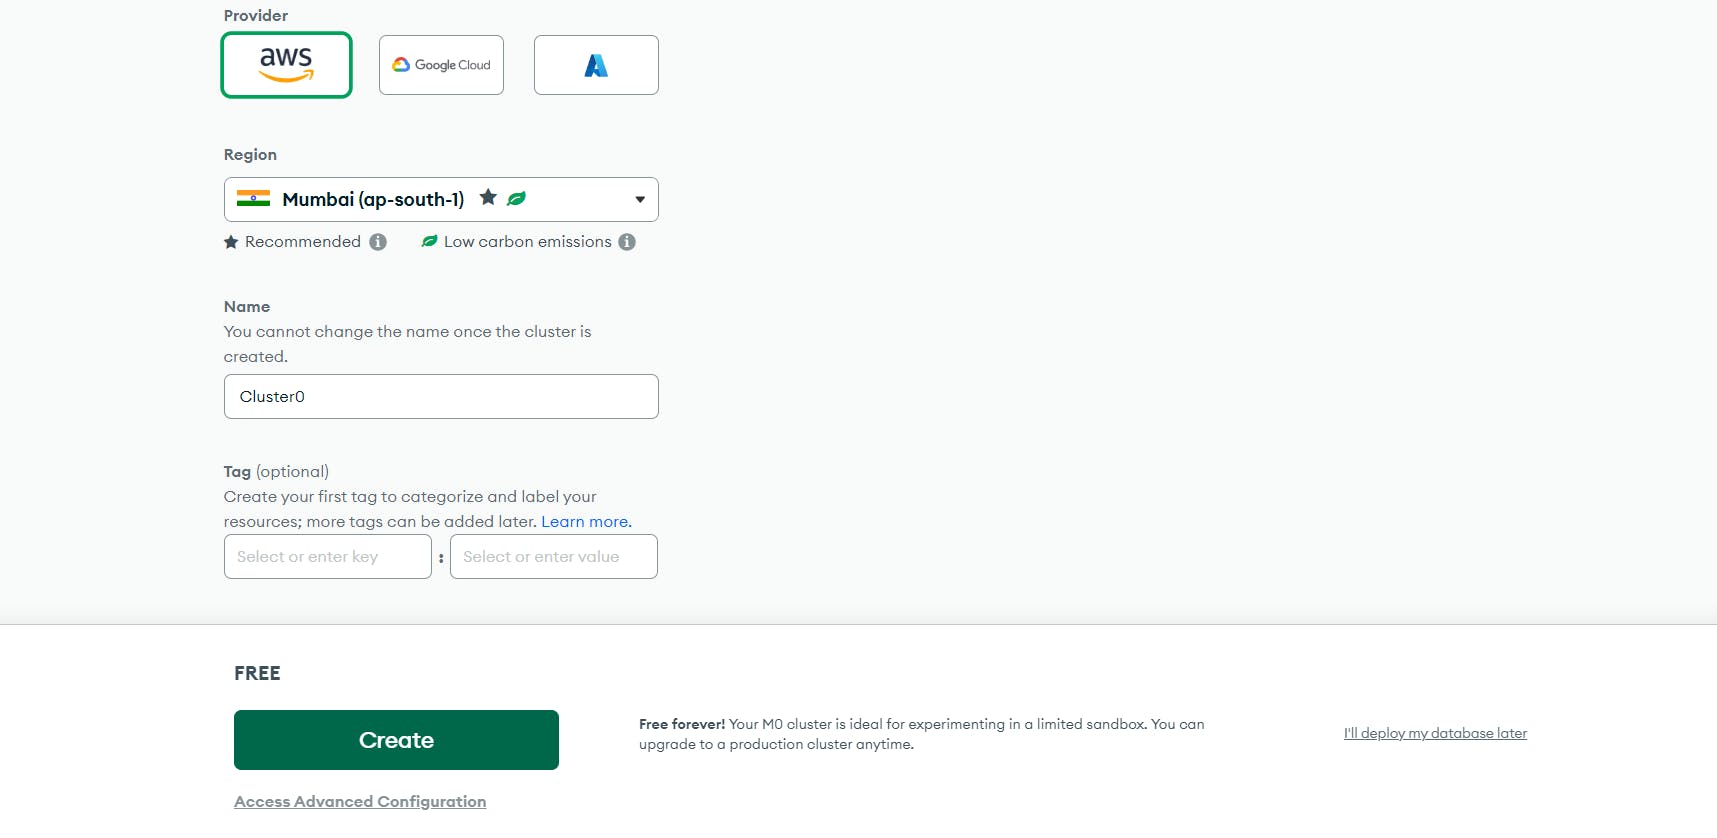
Go to mongodb atlas
create a new project and give it a name and hit create project button.

Then follow the below mentioned steps to create a database.
Leave the default values as it is and hit create.


After creating the database, click on connect button in database deployments page to connect express app with the database.

Choose Drivers to connect to your application and then copy the connection string by adding your password that you added while creating a database user.

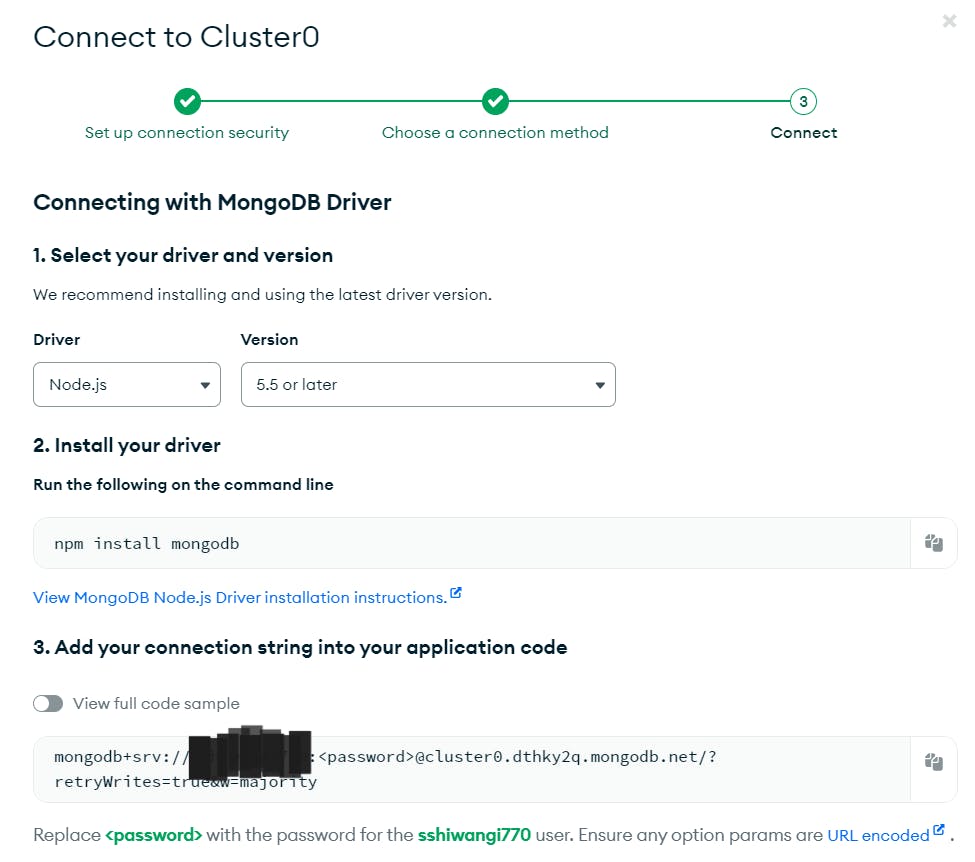
Create an .env file in the root directory and paste this string after changing the username and password.
MONGODB_URL=mongodb+srv://<yourdatabase>:<password>@cluster0.dthky2q.mongodb.net/?retryWrites=true&w=majority
Now coming back to vs code, create a new folder in the root directory and name it db or database and create a new file inside db and name it
connect.jsIn the connect.js require mongoose and then paste the following code.
const mongoose = require("mongoose");

const connectDB = (uri) => {
  return mongoose.connect(uri, {
    useNewUrlParser: true,
    useUnifiedTopology: true,
  });
};
module.exports = connectDB;
- In the app.js file, import this connectDB function from the connect.js file.
const connectDB = require("./database/connect");
const start = async () => {
  try {
    await connectDB(process.env.MONGODB_URL);
    app.listen(PORT, () => {
      console.log(`Database connected at ${PORT}`);
    });
  } catch (error) {
    console.log(error);
  }
};
start();
Setting up Routes and Controllers using Express routers and creating database schema
Create 2 more folders one for Routes and one for controllers.
Go to controllers and routes and create files booksControllers.js in controllers folder and booksRoutes.js file in the routes folder.
the structure will look something like this
BOOKS-API
│   .env
│   .gitignore
│   index.js
│   package-lock.json
│   package.json
│
├── controllers
│   └── booksControllers.js
│
├── database
│   └── connect.js
│
├── models
│   └── bookModel.js
│
├── routes
│   └── booksRoutes.js
│
└── node_modules
Create a models folder and create a new file over there with the name bookModel.js (note: it should be in singular not plural form)
In the bookModel.js model, write this code
 const mongoose = require("mongoose");

 const bookSchema = new mongoose.Schema({
   title: String,
   author: String,
 });

 const Book = mongoose.model("Book", bookSchema);

 module.exports = Book;
Go to routes. (Routes will have data of all the paths where we will go and controllers tells us what to do after going to the paths )
in booksRoutes.js, again connect with express and define routes like this.
const express = require("express");
const router = express.Router();
const booksController = require("../controllers/booksControllers");

router.post("/books", booksController.createBook);
router.get("/books", booksController.getBooks);
router.get("/books/:id", booksController.getBookById);
router.delete("/books/:id", booksController.deleteBook);
router.put("/books/:id", booksController.updateBook);
module.exports = router;
- then in the controller’s booksControllers.js, define the functions declared in the router’s folder and export it. like this
const Book = require("../models/bookModel");

exports.createBook = async (req, res) => {
  try {
    const newBook = req.body;
    const createdBook = await Book.create(newBook);
    res.json(createdBook);
  } catch (err) {
    console.error(err);
    res.status(500).send("Internal Server Error");
  }
};

exports.getBooks = async (req, res) => {
  try {
    const authorName = req.query.author;
    let query = {};

    if (authorName) {
      query = { author: authorName };
    }

    const books = await Book.find(query);
    res.json(books);
  } catch (err) {
    console.error(err);
    res.status(500).send("Internal Server Error");
  }
};

exports.getBookById = async (req, res) => {
  try {
    const bookId = req.params.id;
    const book = await Book.findById(bookId);

    if (!book) {
      return res.status(404).send("Book not found");
    }

    res.json(book);
  } catch (err) {
    console.error(err);
    res.status(500).send("Internal Server Error");
  }
};

exports.deleteBook = async (req, res) => {
  try {
    const bookId = req.params.id;
    const deletedBook = await Book.findByIdAndDelete(bookId);

    if (!deletedBook) {
      return res.status(404).send("Book not found");
    }

    res.status(200).send("Book deleted successfully");
  } catch (err) {
    console.error(err);
    res.status(500).send("Internal Server Error");
  }
};

exports.updateBook = async (req, res) => {
  try {
    const bookId = req.params.id;
    const updatedBookData = req.body;

    const updatedBook = await Book.findByIdAndUpdate(bookId, updatedBookData, {
      new: true,
    });

    if (!updatedBook) {
      return res.status(404).send("Book not found");
    }

    res.json(updatedBook);
  } catch (err) {
    console.error(err);
    res.status(500).send("Internal Server Error");
  }
};
- Now go to app.js and import this booksRoutes file from routes and set up the router like this.
require("dotenv").config();
const express = require("express");
const connectDB = require("./database/connect");

const app = express();

const PORT = process.env.PORT || 5000;

const books_routes = require("./routes/booksRoutes");
app.use(express.json());

app.get("/", (req, res) => {
  res.send("Hello, This is a Books API");
});

//setting router
app.use(books_routes);

const start = async () => {
  try {
    await connectDB(process.env.MONGODB_URL);
    app.listen(PORT, () => {
      console.log(`Database connected at ${PORT}`);
    });
  } catch (error) {
    console.log(error);
  }
};
start();
So that's it, you've created your first REST API. Now let's move on to the testing part.
Testing your REST API on postman
Go to postman and create a new collection
click on three dots and create requests, we have to check for 5 routes that if they are working or not
Adding Books
create the new request and set the method to be of post and then and then enter this url in the link
<http://localhost:5000/books>
Then go to body, and select raw from the dropdown and then select json and enter this
{
    "title": "Bharat-Bharati",
    "author": "Maithili Sharan Gupt"
}
And click on send request
if you get a response 200 OK and the book details that you added then it’s working fine
Getting books
Create a new request and set the method to be of Get, and add the link like this
<http://localhost:5000/books>
and hit send request
You will get a 200ok request and an array containing list of all books
Getting books by id
Copy id of the existing book from the mogodb database or from the list of books and use this url
http://localhost:5000/books/<bookid>
upon hitting send, you will see the book with this id.
Updating books by id
change the method to be PUT, and enter this url
http://localhost:5000/books/<bookidtobeupdated>
//here add the id of the book that you want to update.
Go to body then raw and then json and add the new updated title and author like this
{
    "title": "Rashmirathiii",
    "author": "Ramdhari Singh Dinkar"
}
You can see i have added two extra 'i' after title
so when you send it, you will see updated title of this book with a request of 200 OK
Deleting books by id
Change the method to be of DELETE and enter this url
http://localhost:5000/books/<bookidtobbedeleted>
//replace it with the id of the book you want to delete
and then hit send, you will see a message that book deleted successfully with a response status of 200 OK
Thank you for reading this blog, i hope you are all set to create your own REST API now. Feel free to comment about the part you didn't understand. I will be happy to help you.
Don't forget to like and share it with your friends.